Baked oatmeal has its origins in the Amish country, but it seems to be exploding in popularity right now (in the blogosphere, anyway.) It’s no wonder, since it’s such a homey and satisfying breakfast.  Don’t get me wrong, I love me a bowl of plain oatmeal, but this is breakfast of a higher order.

Some of the older recipes for baked oatmeal are really more like dessert, with loads of butter and nearly a cup of sugar. My version is more heart-healthy, with just a touch of oil, and applesauce & blueberries adding most of the sweetness. Still, it feels like a nice morning treat.

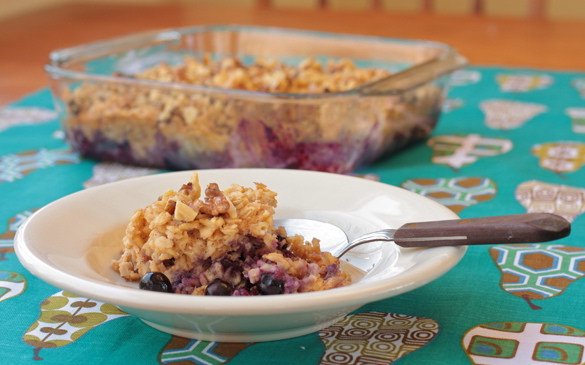
It’s difficult to describe the texture of baked oatmeal. I guess it’s a bit spongy and bread pudding-like. I put a layer of fresh blueberries on the bottom – an idea I picked up from a Seven Spoons recipe. I can’t wait to try variations on this dish, maybe using apples, dried tart cherries, or different nuts and seeds. Peanut butter baked oatmeal? That just might be in my future, too.

This post is my entry into this month’s Breakfast Club event, originated by Helen at Fuss Free Flavors. The theme this time is whole grains – right up my alley.

Baked Blueberry Oatmeal

2 cups old fashioned oats
½ cup unsweetened applesauce
1 large egg, beaten
1 tablespoon canola oil
1 cup nonfat milk
½ cup plain, nonfat yogurt (not Greek)
1 teaspoon cinnamon
1 teaspoon baking powder
¼ teaspoon salt
2 tablespoons turbinado sugar, or other sweetener
½ teaspoon vanilla
1 cup fresh blueberries
½ cup walnuts or pecans, chopped

Vegan variation: substitute 2 tablespoons ground flax seed whisked with ¼ cup water for the egg; substitute 1 ½ cups almond milk for the yogurt and milk.

Combine all ingredients except blueberries and walnuts in a medium bowl. Cover and refrigerate overnight.

In the morning, heat the oven to 350 degrees.

Lightly oil an 8-inch square baking dish. Place the blueberries on the bottom, and cover with the oatmeal mixture. Sprinkle the walnuts on top.

Bake, uncovered, for 35 minutes.  Slice and serve, either plain or topped with warm milk.

Serves 4-6

Sound good to you?  Please give it a shout-out on Facebook or Twitter, or submit it to StumbleUpon.  Thanks!


When I was in San Francisco over the holidays, one of my first stops was at the Rancho Gordo stand at the Ferry Building Farmer’s Market. I was eyeing the beautiful Christmas lima beans and the woman from RG said, “Those are really great with mushrooms.” Hmmm. I’m not sure why, but I’d never paired beans and mushrooms before, so I just knew I had to try it.

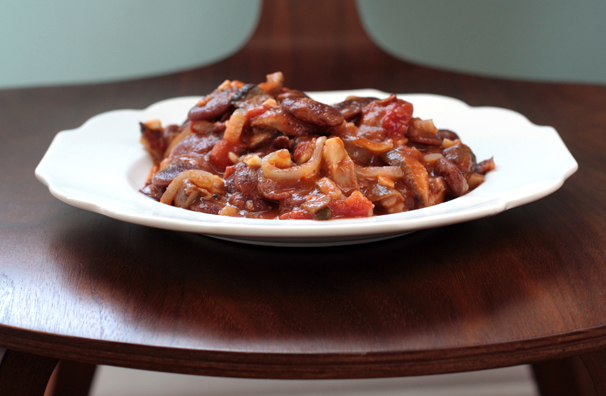
With no recipe to go on, I winged it. Which I’m proud to say, I’m getting pretty damn good at! This impromptu stew features the plump Christmas limas, portobello and shiitake mushrooms, onions, tomatoes and fresh herbs. It’s hard to believe something so simple could be so incredibly good – my dinner guests were still raving about it the next day. I served it on soft polenta, but it would also be delicious on its own with just some crusty whole wheat bread.

If your only impression of lima beans is those boring little green things your parents forced you to eat as a kid, you’re in for a pleasant surprise. Christmas limas are a whole different animal – they’re huge and taste a bit like chestnuts. But if you can’t get your hands on any, don’t fret. This stew would also be good with gigante beans (giant Greek white beans), or even cannellini or cranberry beans.

This is my entry into My Legume Love Affair, a popular recurring event organized by Susan Wolfe from The Well Seasoned Cook, and being hosted this time by Ammalu’s Kitchen. I’ll be hosting the event myself in September, so start working on your bean recipes, everyone!

Heirloom Bean and Mushroom Stew

1 pound large beans (Christmas limas, gigantes, etc.), soaked overnight
1/4 cup extra virgin olive oil
2 medium onions, halved lengthwise and thinly sliced
8 cloves garlic, roughly chopped
6 ounces portobello mushrooms, chopped
8 ounces shiitake mushrooms, thickly sliced
3 springs fresh thyme
1 28-ounce can whole plum tomatoes in puree
1/2 cup red or white wine
1/2 cup reserved bean cooking liquid, or additional wine
1/2 cup chopped flat-leaf parsley
1 teaspoon salt
1/2 teaspoon freshly ground black pepper

Place the beans in a large pot and cover with water by about two inches. Bring to a boil, then reduce heat and simmer until the beans are tender (mine took nearly two hours; smaller beans will take significantly less time.) Drain, reserving a half-cup of cooking liquid.

Heat the olive oil over medium heat in another dutch oven or very deep skillet. Add the onions and garlic, and saute for 5 minutes. Add the mushrooms and thyme, raise the heat to medium-high and cook for 5 minutes longer, stirring constantly. Add the tomatoes including the puree, crushing the tomatoes with your hands and discarding the hard stem ends. Add the wine, bean cooking liquid, parsley, salt and pepper. Gently stir in the beans. Simmer, partially covered, for about 20 minutes.

Please comment, tweet, “Like” and share this post using the buttons below. Plus, check out some other bean stew recipes that you might enjoy:

Cranberry bean and escarole stew
Cannellini bean stew with fresh herbs
Pasta with beans, greens and vegetarian sausage


Now before you Irish people start yelling at me, yes – I know this is not an altogether traditional Irish soda bread. “Real” soda bread does not include honey or any other sweetener, for instance. But I like the hint of sweetness it adds. (Hey, at least I didn’t add orange zest.)

I started out to create a 100% whole grain bread – also not traditional – and quickly decided on white whole wheat flour, which is lighter in taste but has the same nutritional value as regular whole wheat flour. I mixed in some oat flour because, well, it just seemed like the thing to do.

In one other departure, I made this bread with kefir instead of buttermilk. But that was just for the simple reason that my store was out of buttermilk (WTF?). But it turns out, kefir – a cultured milk product that’s fermented with kefir grains – worked perfectly. In fact, maybe next time I’ll make it with goat’s milk kefir.

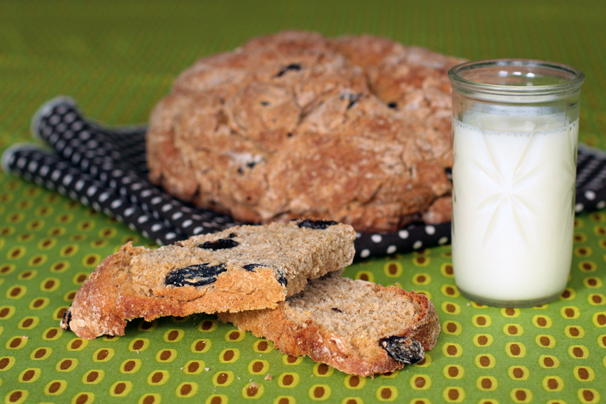
Needless to say, I’m thrilled with the result. The bread has a slightly darker color than your usual soda bread, but it definitely doesn’t taste whole-wheat-y. The raisins and caraway seeds make it a richly-flavored bread that would be perfect for breakfast. Of course, I just ate some for a midnight snack, too.

Whole Grain Irish Soda Bread

3 1/2 cups white whole wheat flour
1 cup oat flour (or finely ground oatmeal)
1 1/2 tsp. baking soda
1 t. baking powder
1 tsp. salt
1 1/2 teaspoons caraway seeds
¾ cup raisins
2 cups lowfat buttermilk or kefir
2 tablespoons honey

Heat the oven to 375 degrees.

Mix the flours, baking soda, baking powder and salt in a large bowl. Stir in the raisins and caraway seeds.

In a separate bowl, whisk the buttermilk or kefir and the honey. Stir into the dry mixture, mixing only until the dough just comes together. Transfer to a floured surface and form into a round loaf. Don’t overmix, or the bread will be tough.

Place on a lightly greased cast iron skillet or baking sheet. Score a deep X in the top of the dough. Bake for 45 minutes, or until the loaf sounds hollow when you tap the bottom. Cool before slicing.


This recipe was the winner in this week’s Kitchen Challenge over on Salon. It also won a cooking throwdown at my office. Woohoo!

Being an almost-vegan, the idea of vegan cheese should appeal to me, but to be honest, I think it’s silly. I’ve had nut cheeses made from cashews, and they tend to be bland and tasteless. The main flavor tends to come from the nutritional yeast that’s often used. Sorry, but if I want cheese, I’ll break my cardiologist-ordered diet and eat a bite or two of English farmhouse cheddar.

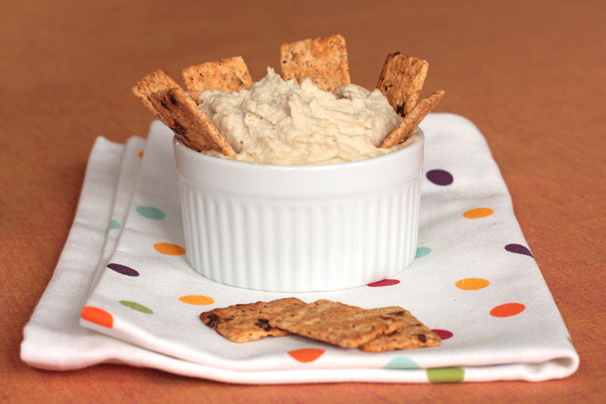
Having said that, I took one cue from the vegan cheeseheads in developing my rich and creamy Italian cashew spread: I soaked the cashews overnight to make them soft. But rather than going for a thick, cheese-like texture, I created a spread that’s more reminiscent of a white bean dip. The hefty dose of roasted garlic, along with lemon and olive oil, put it in a whole different league than faux cheese.

This would be good served on whole grain bread, garlic crostini, or even cucumber slices. If you have it on crackers, be sure they don’t have a strong flavor or the crackers will overwhelm the lovely roasted garlic taste.

Cashew Roasted Garlic Spread

2 cups raw cashews
1 whole head garlic
1 tablespoon + 1 teaspoon extra virgin olive oil
2 tablespoons lemon juice
5 tablespoons water
1/2 teaspoon salt
1/4 teaspoon freshly ground black pepper

Soak the cashews in a large bowl of cold water for 6 hours or overnight, then drain.

Preheat the oven to 400. Peel off the outer papery skin of the garlic head. Slice along the top of the bulb to reveal a bit of the cloves. Place in a baking pan, drizzle with a teaspoon of olive oil. Cover with foil and bake for 40 minutes.

Place the drained cashews in a food processor. Add the roasted garlic, squeezing out the contents of each clove. Add the remaining ingredients and process until very smooth.

Like this recipe? Make it, share it, tweet it, comment on it!

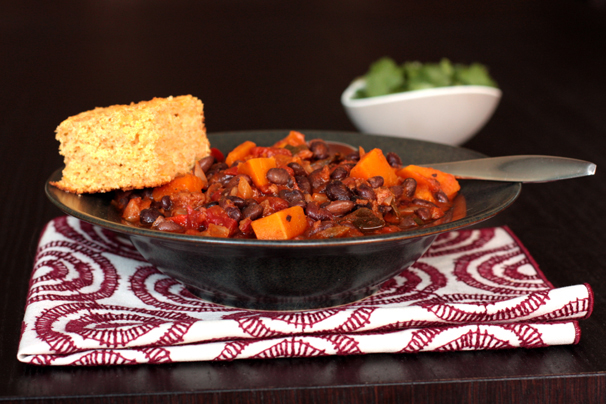
It’s remarkable how much variety there can be just within the world of vegetarian chili. The last one I posted was dark and smoky, with chipotles, beer, and chocolate. This black bean chili is brighter and slightly sweet, but still has the requisite ass-kicking spiciness. And I love the way the butternut squash and the black beans play off each other – both color and flavor-wise.

I made this with seitan and loved it, but if you want a firmer texture, you can use a vegetarian beef product. I don’t often go for the soy-based fake meat stuff, but Lightlife’s Mexican-flavor “Smart Ground” works really well here. Or you can leave it out altogether – the beans and squash are the real stars of this chili.

The better the ingredients you use for this chili, the better it will be. Grind your own cumin seeds, use pure chile powders and track down Mexican oregano and you’ll achieve black bean chili supremacy. I used Rancho Gordo’s Midnight Black beans, and I’m sure that didn’t hurt, either. Of course, that’s not to say it won’t still be delicious with regular ol’ ground cumin, chili powder and oregano. It’s just a matter of how crazy you want to get (me, I’m on the crazy end of the chili scale.)

Black Bean Chili with Butternut Squash

1 pound black beans, soaked overnight (or use the quick soak method)
2 tablespoons organic canola oil or high-oleic safflower oil
2 medium-large yellow onions, chopped
4 cloves garlic, minced
1 poblano pepper, chopped
1 red bell pepper, chopped
4 jalapeno peppers, minced
8 ounces minced seitan, or a 12-ounce package of vegetarian ground beef (see note above)
3 tablespoons chili powder (I used 2 tablespoons of ancho and 1 New Mexican)
1 teaspoon cayenne pepper
1 tablespoon ground cumin
1 1/2 teaspoons oregano, preferably Mexican
1/2 teaspoon salt
1/2 teaspoon freshly ground black pepper
1 28-ounce can diced tomatoes
3 cups chopped butternut squash (1/2-inch cubes)
1/3 cup chopped fresh cilantro

Put the black beans in a large pot and cover with cold water by 2 inches. Bring to a boil, reduce heat and simmer until tender, about 45 minutes. Drain, reserving cooking liquid.

Heat the oil in another heavy-bottomed pot. Add the onions, garlic, poblanos, bell peppers and jalapenos and cook for 5 minutes, stirring occasionally. Add the vegetarian beef or seitan along with all the spices, oregano, salt and pepper, and cook 2 minutes longer. Add the tomatoes, butternut squash and 4 cups of the reserved bean cooking liquid. Cook for 8 minutes, then add the black beans and cook until the squash is tender, about 20 minutes. Taste for salt and adjust as you’d like. (At this point, chili can be cooled then refrigerated until the next day – it will be even better then.) Stir in cilantro and serve.

Serves 6, with leftovers

Other recipes you might like: Smoky and Spicy Vegetarian Chili

If you like this post, please leave a comment. Or Tweet it, Like it, or otherwise share it. Thank you!

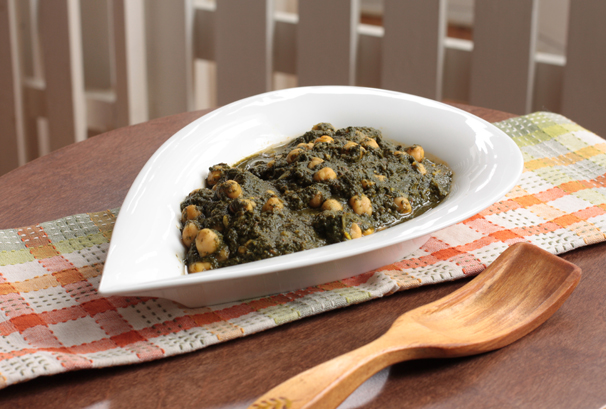
With both spinach and chickpeas, this curry is hyper-nutritious. You’ve got your fiber, your protein, your iron and your vitamins A and C. Chana saag is like health in a bowl! It’s perfect on its own with brown basmati rice, or as a part of a larger feast. For a recent Indian-themed dinner party I served it along with seitan tikka masala, baingan bhurta (smoky eggplant) and aloo gobi (potato and cauliflower curry.)

I recommend serving raita along with this dish, as it helps cut the intensity of the spinach a bit. You can make a nice simple one with yogurt (or soy yogurt), minced cucumber, fresh mint and cumin. This recipe would also be terrific with mustard greens in place of the spinach, although you’d have to cook the greens for a minute or two longer.

It’s funny to see how some people react when I tell them I like to cook Indian food. Their eyes get really big and they say something along the lines of “that must be so difficult, how did you learn?”  Well, I started by cooking from Suvir Suran’s Indian Home Cooking (which is available in my new Amazon store, right on this blog!)  It’s a great book that has approachable yet authentic recipes – and none of them call for ghee, so it’s heart-healthy. If you’re an Indian food novice, it’s a great cookbook to start with. But the truth is, once you go out and buy all the necessary spices, cooking Indian food is surprisingly simple.

Oh, and if you want the recipe for the aforementioned seitan tikka masala – which was incredible – just email me through the “contact” link above and I’ll send it along. Frankly, it just wasn’t pretty enough for the blog (or should I say my photo skills weren’t good enough to make it presentable.) In any case, the flavor more than makes up for its homely appearance. So do give me a shout if you’d like that recipe. If you’re in Brooklyn, you might even score an invitation to my next Indian feast!

Photo prop fun: I picked up the cool teardrop-shaped dish at Fishs Eddy. And if you’re wondering what the fence-like thing is in the background of the photo, it’s actually part of a sculpture created by my über-talented artist husband, Tim. See his work here.

Chickpea and Spinach Curry (chana saag)

1 pound baby spinach
1 or 2 small hot green chiles (such as serranos), minced
3 tablespoons organic canola or high-oleic safflower oil
1 teaspoon cumin seeds
½ teaspoon black mustard seeds
3 green cardamom seeds
1 pinch asafoetida powder
4 cloves garlic, chopped
1-inch piece ginger, minced or grated
1 medium yellow onion, finely chopped
1½ cups canned crushed tomatoes, or 3 ripe tomatoes, roughly pureed
1 teaspoon lemon juice
4 teaspoons ground coriander
2 teaspoons ground cumin powder
1 teaspoon turmeric
½ teaspoon cayenne pepper
1 teaspoon salt
2 15 ounce cans chickpeas, rinsed
2 teaspoons garam masala

Bring a pot of water to boil. Add the baby spinach and cook until tender, about 1 to 2 minutes. Drain well and squeeze out excess liquid. Place in a food processor along with the green chile, and process until smooth, adding a bit of water only as necessary to create a puree.

Heat the oil over medium-high heat in a large deep skillet or dutch oven. Add the cumin seeds, mustard seeds, cardamom and asafoetida and cook for 2 minutes. Add the onions, ginger and garlic and cook, stirring constantly, until onions start to brown around the edges, about 4-5 minutes. Add the tomatoes, lemon juice, coriander, cumin powder, turmeric and cayenne. Reduce the heat and simmer for 6-7 minutes, stirring frequently. Add the spinach puree, salt and chickpeas. Partially cover and simmer for 8-10 minutes, adding a bit of water if mixture seems too thick. Add garam masala and additional salt if needed, and serve.

If you like this recipe – or just think your spicy food-lovin’ cousin might like it – please tweet it, like it or share it!